

Create & configure booking pages
Create as many booking pages as you like, configure them across eight sections, switch them active or inactive at any time — and know how blocked days, booked rooms, selected room time windows and a room's turn-around time affect a booking.
Booking pages let your customers inquire about or book events directly online. You can create as many pages as you like — for example one per occasion, customer group, or location — and set up each page across eight clearly organized sections.
In the first video you set up a booking page from start to finish — design and link, capacity, released products, delivery radius, prices, custom questions and the English version.
What the finished page looks like for your customers is shown in the second video: the three designs inquiry, stepper and web shop, clicked through from the guest’s side until the inquiry lands in your inbox.
You’ll find the individual steps written out below as well.
Creating and managing booking pages
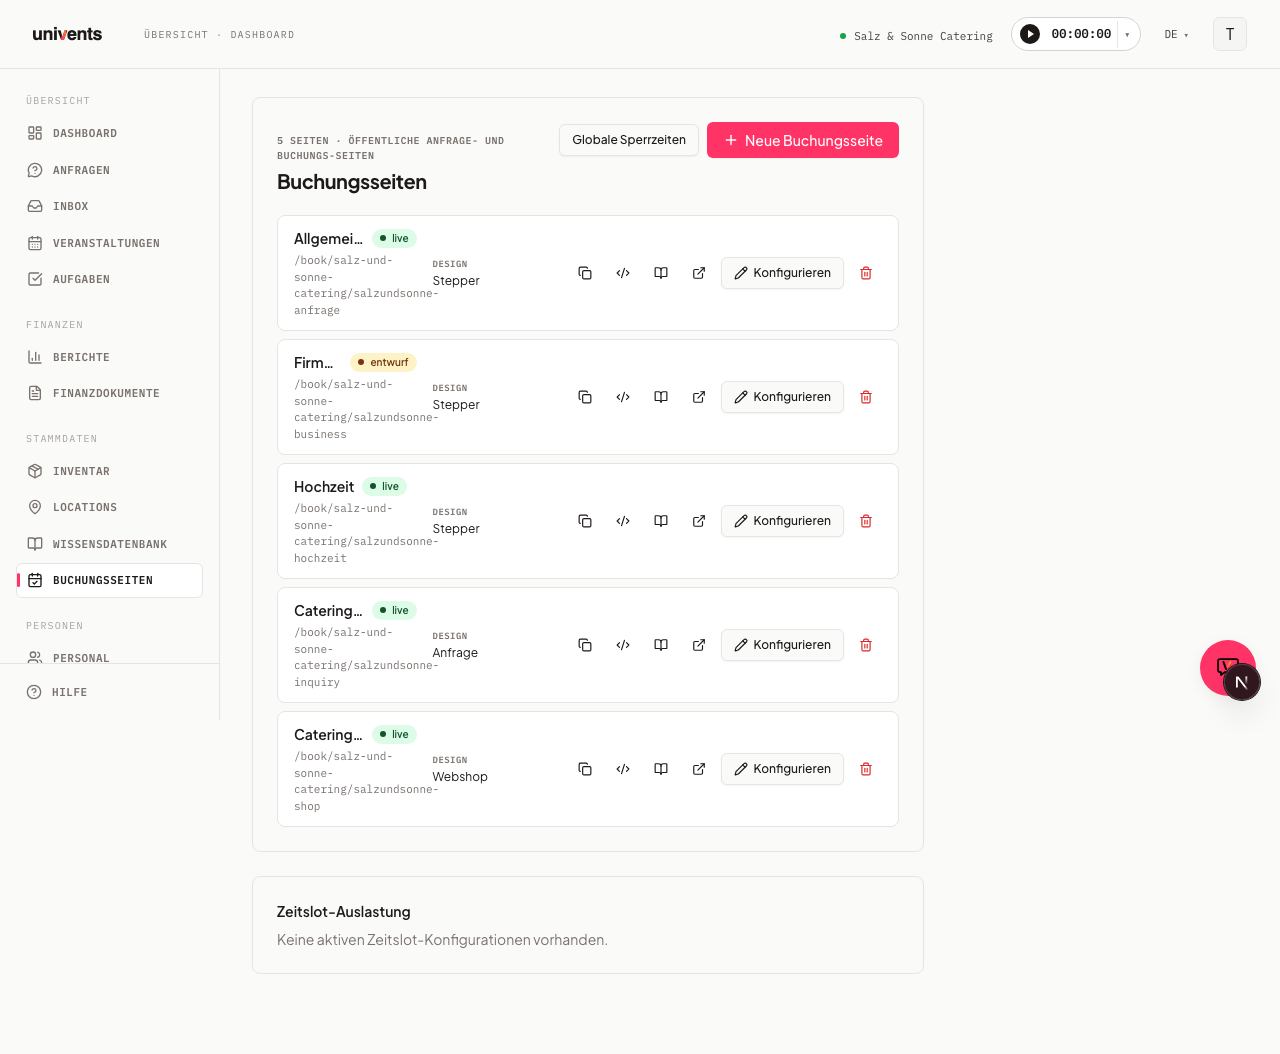
You'll find your booking pages in the settings under Booking Pages. All existing pages are listed there one below the other, each with its name, status, design, and public URL.
- Click New Booking Page at the top right to create a page.
- Use the Configure button to open an existing page for editing.
- Use the status dot next to the name (showing live or draft) to switch a page active or inactive with a single click.
Every row offers additional icon actions with tooltips: Copy booking link, Copy embed snippet, Open embed instructions, Open live preview, and the trash icon to delete. Use the Global Blackout Periods button to block booking across all pages for a specific time frame, for example during company holidays. Blockouts for a single room are managed on the room itself (see Creating and getting the most out of event locations).
Section 01 Details
The editor opens as a large window with a section bar on the left. The first section, Details, contains the page's basic settings.
- Logo: Upload a logo that applies to this page only. If you leave the field empty, the workspace logo is used automatically. Remove logo takes a logo away again — the workspace logo applies afterwards.
- Hero image: The large cover image at the top of the webshop, on inquiry pages and on ticket pages. In the webshop and on inquiry pages the description sits below the image. You'll find the recommended size and format for the hero image and the logo in Image sizes for products, webshop & locations.
- Name and Description: Used to tell your pages apart internally.
- Shop info block (Webshop design only): A freely formatted text for general notes that apply to all items, such as delivery terms, minimum order value, cleaning or damage. Guests see it without clicking an item, between the cover image and the “When & for how many?” selection. If the field is empty, no block appears. You maintain the translation in the Languages section. The text also appears on the Enquire & book page below the cart (headed Order information), and can be collapsed on mobile. To show a different text in the cart, fill in the Cart info text field below it; if it stays empty, the shop info block is used there as well.
- Design: Choose between Stepper, Webshop, Inquiry, and AI chat. The webshop suits simple ordering processes, while the stepper design guides customers through the inquiry step by step. With the AI chat, visitors describe what they need in a chat and send a finished inquiry at the end (see “AI chat on the booking page”).
- URL slug: Determines the path of the public address. Below it you'll see the finished preview URL.
- Legal links: Under Imprint URL, Privacy policy URL, and Terms URL you enter the matching pages. These links appear in the footer of every booking page — without them, the legal footer stays empty. They're required in the DACH region.
- Email Notifications: Enter addresses, or use Add contact to select existing contacts who should be notified of every new booking. If you enter your own e-mail address here, you receive the same full e-mail with all the details from the form as every other recipient — not just the short notice. The bell in the app stays as well.
- Automatic Confirmation Email: When this toggle is on, the customer automatically receives a confirmation email when their inquiry is received. The default template names the requested date, the written-out weekday and the guest count and contains a button that lets the customer follow the inquiry online. Maintain your own texts under Settings → Email templates (see Editing email templates).
Section 02 Inquiries and Section 03 Bookings
In Inquiries you control how many bookings can happen at once and how much lead time is required.
- Concurrent inquiries allowed: The maximum number of open inquiries per day before new ones are declined.
- Max. parallel events: How many events may run in parallel across the whole workspace. This limit covers all venues together. A per-venue limit goes on the venue itself (field Parallel events, see Creating and using event locations). The check uses the real time in your workspace time zone; parties past midnight are recognized, and starting right after another event is fine (your page’s buffer time applies). A request without a time is only rejected if the day has no free window of at least 4 hours left. Ticket requests on a ticket sale page are exempt from this limit.
- Buffer time between events and Minimum lead time: In hours and in days, respectively.
- Registration deadline: The date and time up to which sign-ups are possible; after that the page shows your notice instead of the form. You can also set the lead time for several pages at once — both are explained in this article.
- Block the whole day when an event is booked: If the venue already has an event on a day, the whole day can no longer be requested – even if a few hours would still be free. The toggle is off by default; then a day stays selectable as long as a free window of at least 4 hours remains (see below).
- Limit orders to delivery radius: Enable the option and enter a Delivery address and Delivery radius (km). The radius is a circle around the origin address — it checks the straight-line distance, not the driving route.
- Calculate travel cost: Can be enabled independently of the delivery radius — the driving distance in kilometers is calculated automatically from the customer's address (via Google Maps: the route by car, not the straight line). For it to have an effect you need a product on the page with billing model "per kilometer" (as a preset or selectable product); the calculated distance fills that product's quantity. Your customer already sees the kilometers in the price preview, and exactly this distance is then stored as Distance (km) on the event. If Google can't find a route, the page falls back to the straight-line distance — the booking still goes through. Both toggles — delivery radius and travel cost — can be enabled independently or together; as soon as either one is on, the shared Origin address (delivery & travel) field appears.
- Location chosen = no event address needed: If your guest picks one of your locations on the inquiry page or with the “Location first” design, the Event address is no longer required – even with a delivery radius or travel cost enabled. The delivery area is not checked then, since the event takes place at your location. Travel is then 0 km, even if the guest still enters an address: a “per kilometer” product drops out of the cart, the inquiry and the quote entirely. Without a chosen location the address stays required.
- Delivery or pickup: On an inquiry page, switch on Ask for delivery or pickup under Questions. Your guest then chooses “Delivery” or “Pickup” – in the step-by-step layout at the top of the address step, otherwise right above the event address. With Pickup the event address is not needed, the delivery area is not checked and the travel distance is 0 km: a product charged “per kilometer” drops out of the inquiry and the quote, just like with a chosen location. With Delivery everything stays as described above. If the address would otherwise be required, the guest has to choose before moving on. You see the choice in the inquiry under Internal notes, on the event in the Internal notes card and in the notification email. If the page also offers locations, choosing “Delivery” or “Pickup” replaces the location: without a chosen location the guest then has to pick one of the two, and the inquiry goes out without a location.
- Inquiry naming: Overrides your workspace's naming template for events created from this booking page. Leave it empty to inherit the workspace default.
In Bookings you define what can be booked:
- Pre-filled products are automatically added to every inquiry.
- Selectable products can be added by the customer.
- Category instead of individual: If you switch Pre-filled products or Selectable products to Category, every active product in the selected categories appears automatically, including ones you add later. Take individual ones back out under Excluded products, for example a seasonal menu that has ended. They then no longer appear on the page and cannot be booked. A product you also picked under Individual stays on the page.
- Guest groups: If you pick groups from your catalogue here, your guests enter the number of people split up instead of as one number. You maintain the groups under Settings → Guest groups (see Split guests into groups). The fields follow the catalogue order, and the total below them adds up the counting groups only. If the selection stays empty, the page looks exactly as before.
- Linked locations determine which rooms are available to choose from. With Allow multiple event location selection, the customer can combine several rooms. If you link no location, the page does not ask for one and does not require one either. If you link exactly one location, the page does not ask for it either: it is selected automatically and is attached to every inquiry as if the guest had clicked its card – with booked and blocked days in the calendar, its capacity, the double-booking protection and its Required products (in the price overview as the line Room rental). If it is taken on the chosen day or too small for the number of guests, the notice appears right at the date or the guest count. If the guest chooses “Delivery” or “Pickup”, the location is not attached to the inquiry; the third option At the venue takes them back. If a Required product of the location offers time slots, its card stays visible and is already selected, so the guest can pick the time slot. If the page calculates travel costs or is restricted to a delivery radius without asking for delivery or pickup, the single location stays visible and optional as before – without a click the inquiry counts as a delivery there.
- Products of a location (“Location first” design): products you set as Available on a linked location appear for selection automatically as soon as the guest picks that location — you don't need to add them under Selectable products as well. Required products are booked automatically when the location is chosen. For all other designs, only the page's product list counts.
- New request after submitting (“Location first” design): after submitting, the guest can start another request straight away with Submit another request. The page then starts again at the venue selection.
- Location rent before sending: your customer sees the Required products of the chosen location, such as the room rental, before sending. In the stepper and with “Location first” they are lines in the cart. In the webshop, the inquiry form and the AI chat they appear in the price overview as a line of their own, Room rental, with amount and calculation (for example “€100.00 × 16 hrs.”), and count towards the total — so the overview states the same amount as the inquiry later on. They are priced at the catalogue price with the billing model of the product; “per hour” uses the booked hours (on multi-day events the hours of each day). Price rules and discount codes do not apply to this line, and it does not count towards the page's minimum order value. With Show prices switched off, no amount appears for the rent either.
As soon as your page links rooms, double-booking protection is active automatically. A room is taken by a firm booking — an accepted or confirmed event. An open inquiry does not hold the room: several inquiries can be open for the same room at the same time. How many are allowed per day is governed solely by the Concurrent inquiries allowed setting of your booking page. If you want to allow several events at the same time in one room, enter the number on the room itself, in the Parallel events field.
Three things that often come up:
- What gets checked is the time period, not the calendar day. If a room is firmly booked from 10am to 2pm, it stays bookable from 6pm on the same day — a guest can inquire about the same room on the same day at a different time. Only bookings that overlap an existing one are declined. Parties that run past midnight (for example 7pm to 3am) are recognised correctly.
- The buffer time counts too. The value from Buffer time between events (Inquiries section) applies before and after every firm booking. With a two-hour buffer, a room taken from 10am to 2pm is therefore blocked from 8am to 4pm. To allow back-to-back bookings, set the buffer time to 0.
- If the room carries a turn-around time of its own, the larger of the two applies. When a room has a value under Turn-around and cleaning time (minutes) (see Creating and getting the most out of event locations), the larger of the two values takes effect — not the sum. Two hours on the page and 30 minutes on the room therefore mean two hours; with a page buffer of 0, the room's 90 minutes still block.
- It counts across the whole workspace, not the individual page. If you offer the same room on several booking pages, a firm booking through page A also blocks an inquiry through page B. Otherwise the protection could simply be bypassed via the second route.
- Without a time of day, a free window of at least 4 hours is enough. If a guest inquires about a day only, the guest can still send the inquiry as long as a free window of at least 4 hours remains on that day.
Events you created yourself also occupy the room — as soon as they are committed. That is the case once you have set them to Confirmed or live, once your customer has accepted the quote, and for completed or invoiced events. There are two layers here: when an inquiry is submitted, only a firm booking counts — a draft or option of yours does not block submission. In the calendar and the room selection of the booking page, however, your draft or option also greys out the room (the day is blocked if no free 4-hour window remains), so guests do not pick it in the first place. Only open inquiries do not count there.
Not counted: open, declined and archived inquiries. To make a slot bookable again, cancel or move the firm event.
Exception: pages that accept automatically on payment. If your booking page accepts an inquiry automatically once it is paid, an open inquiry there still holds the room — otherwise two paying guests could get the same room.
When you accept an inquiry, other open inquiries are only declined if they want the same room at the same time and the room is then full. Inquiries for other rooms or other times stay open. The declined guests receive no email.
Blocked days and selected room time windows
Blocked periods for this page you maintain in the page editor under Section 01 Details: in the Blocked periods for this page card you add a period with an optional label — one-off or recurring, for example yearly from 01 Nov to 30 Apr for a page that is only bookable in season. It applies to this page only; the Global blocked periods from the booking page overview still apply to every page.
Blocked days are rejected on submit. The date picker already hides blocked days — but the real safeguard sits on submit: Univents checks the blockouts again when the inquiry is submitted and rejects it as soon as a blocked day is involved. That also covers a multi-day booking where a blocked day falls in the middle of the range, and a blockout created after the page was opened. For a single day the guest sees This date is not available. For a multi-day range the message names the blocked day, for example 10/07/2026 is not available for booking. Please choose a period without this day.
Multi-day ranges end before the next blocked day. When the guest picks Multi-day event, the end-date picker greys out blocked days and only offers end dates up to the day before the first blocked day after the start date. If a Wednesday is blocked, for example, a range starting on Monday can run until Tuesday at most. If the guest then changes the start date and the chosen range would cross a blocked day, the end date is cleared again.
All three scopes are checked: the workspace-wide blockouts, the booking page’s own blockouts, and the blockouts of the rooms requested. Recurring blockouts — a weekly closing day, say — are rejected on submit as well.
You see booked and blocked rooms at the date step already. The calendar only greys out a day if one of the selected rooms is unavailable there — because events leave no free time window of at least 4 hours, or because a blockout of the room applies. An open inquiry does not grey out a day. A party that runs until 3am does not block the following day. Below the calendar, the reason names the days affected, for example “Room 2 is not available on these days (greyed out in the calendar): 10/07/2026”. If the guest selects several rooms, each one is checked, so a day stays selectable only if every selected room is free. The room picker by date knows the room’s blockouts too and no longer offers a room on blocked days. The decisive check still happens on submit — the calendar is the early warning, not the gate.
Optionally, an event blocks the whole day. If you switch on Block the whole day when an event is booked in the Inquiries section, the calendar greys out every day on which the selected room already has an event — no matter how many hours would still be free. An evening class from 5:30 pm to 9 pm then blocks exactly that day, not the day before or after; the buffer time does not count here. A multi-day event blocks each of its days, a party past midnight the following day as well. If a room may host several events at the same time, the day is only blocked once that number is reached. The room picker also shows the room as booked on such a day, whatever time the guest chooses. On submit, Univents still checks the time period as before.
A room’s selected time window becomes the event time. If your page offers a room with a product that carries a time window (see Creating & configuring products), the guest picks one of those windows while booking. That window is then the time of the event:
- It wins over the time in the form. If the guest also enters a time, the selected window still applies.
- The inquiry shows the same time. The inquiry row that lands in your inbox and the summary on the page now show exactly the time of the chosen slot — before, they showed the time from the form (or none at all) while the event was already built from the window, so the two disagreed about what the inquiry meant.
- Several rooms span a range. If the guest picks two rooms with 18:00–20:00 and 20:00–23:00, the event runs from 18:00 to 23:00. For a multi-day booking with one window per day, it reaches from the first to the last window.
- It also applies on accept. When you accept the inquiry later on, the event that is created takes over the same window.
- Open requests do not hold a room’s time slot. For time slots of a product linked to a room, only accepted requests count against the capacity per slot. Exception: pages that accept automatically after payment still count every open request. Deleted, archived and “date flexible” requests never count. Time slots not linked to a room (such as a cooking class or a tour) still count all open requests. The slot picker, the pre-check and the back office count the same inquiries.
- Capacity per location. If a time slot is set to per location (see Creating & configuring products), the slot picker shows the free places of the chosen location, and on submit only that location counts. A request without a location does not count towards any single location; it counts against the shared capacity.
- Without a room link nothing changes. Time windows of products that do not belong to a room on the page remain the time of the booking line, as before.
- A booked location is cleared from the selection. On pages with the Location first design the guest picks the location before the date. If they then choose a date or slot on which that location is booked, Univents removes the location from the selection and points it out (“This location is already booked on the selected date – please choose another one.”). Previously the selection stayed and the inquiry only failed at the very end.
Services per hour on multi-day bookings
When a guest books several days, services per hour and per person and hour count each day with that day's times, and the hours of all days are added up:
- Same times every day: 2 days from 10 am to 6 pm are 16 hours, not the 32 hours from the first start to the last end.
- Own times per day: If the guest enters own times for a day, those count. Day 1 from 10 am to 6 pm and day 2 from noon to 4 pm add up to 12 hours. If a day lacks a start or an end, the missing value is taken from the start or end of the booking; a day without any own times uses the start and end of the booking.
- Past midnight: A day from 10 pm to 2 am counts until 2 am on the following day, so 4 hours. Daylight saving changes are counted exactly.
- Room with a time slot: If the guest picks a time slot for a room on a specific day, that slot counts for this day. The event still covers all booked days, not just the day with the time slot.
- Single-day bookings are unchanged. If a line item has its own time slot, that slot still applies.
Exactly these times then also appear on the event under Daily times. The price overview, the product card, the summary, the incoming inquiry, the hourly room rent, answer options with a surcharge, package components and the quote you create from the inquiry all follow this rule, also with a discount code and with direct payment. Quotes, invoices and bookings you edit afterwards in the back office also use these daily times, as long as every day has times. If you later move the event, the daily times move along. If you extend it, the new days have no times until you enter them — until then, documents are calculated as before over the whole period. Univents asks, as after every date change, whether to recalculate the prices of your drafts. More under Daily times of multi-day events.
Splitting the cart per event day (webshop only)
Pages with Design Webshop have an additional toggle in the Bookings section: Split cart per day (default: off). It only takes effect for multi-day bookings: when enabled, the public page shows a day bar above the product grid (Day 1, Day 2, …), and the customer assigns each product to the currently active day — the same product can go into the cart for several days, each with its own quantity. The cart and checkout summary then group the line items by day. When you accept the resulting inquiry, Univents automatically creates one section per day in the quote ("Day 1 – 04.03.2027" etc.), which you can then edit like any other section. Each item also carries its delivery day itself — if you move it to another section, the day stays, and you can create delivery notes per day from it (see Delivery day per item and one delivery note per day). Without the toggle, the cart stays a single flat cart across the whole booking, as before. With the toggle on, a service per hour belongs to exactly one day and counts that day's times, without its own times the start and end of the booking on that day, never the whole event.
Delivery times per day with delivery fee (webshop only)
With Split cart per day switched on, the card Ask for delivery times per day appears below it. Switch it on and Univents suggests three delivery times (Morning 07:00–10:00, Noon 11:00–14:00, Evening 17:00–20:00). Label, earliest and latest time can be changed freely, up to six delivery times in total. You also pick a fee item from your catalogue, for example “Delivery fee” – it does not have to be offered in the webshop. With Preferred time is required (default: on) the guest has to choose a time per delivery.
At checkout, the guest sees the delivery times for every day with items as checkboxes, and a time choice within the allowed range for each chosen delivery (quarter-hour steps). The fee item is charged exactly once per chosen delivery and appears right away in that day’s cart and in the total: morning alone means one fee, morning and noon two. Price, tax and price rules come from the item – ideally an item billed “per piece” or “flat”. The delivery fee does not count towards the minimum order value. As long as a day with items has no delivery (or, if required, no time) chosen, the order cannot be sent.
In the request, every delivery is its own position on the right day, for example “Delivery fee – Morning · 08:30”: in the Bookings tab with its time, in the quote draft in that day’s section. With only one delivery time, deliveries apply to the whole day – which goods come with which delivery is then not assigned. If the fee item or a complete delivery time is missing, the delivery choice stays off on the page; the card in the editor points this out.
With two or more delivery times, the guest puts every item into one delivery. For this, the shop shows a Delivery switch under the day bar with your delivery times (for example Morning · Noon · Evening, each with its number of items); the product cards fill the chosen delivery. Cart and checkout show the deliveries as subheadings within each day. At checkout there are no checkboxes any more: the guest only picks the preferred time for each delivery that contains items, and the delivery fee is added for exactly those deliveries. The same item can sit in several deliveries on the same day; an item’s minimum quantity then applies per delivery, while the minimum order value still applies to the whole cart. The request, the confirmation emails and the quote draft therefore show which goods arrive in the morning, at noon and in the evening: the quote gets its own section for each day and delivery, for example “Day 1 – 05.03.2027 · Morning (07:00–10:00, requested 08:30)”, with the delivery fee in the same section. In the Bookings tab every position shows its delivery, for example “Delivery: Morning · 08:30” – so two positions of the same item on one day are not duplicates. From two delivery times on, the card in the editor points this out as well.
“Something custom? Make an inquiry” in the webshop
Next to the product catalogue, a webshop page shows a small “Custom?” block with a Make an inquiry button — meant for guests who want something the catalogue does not cover.
You choose where the button leads in the Bookings section under “Send inquiry” leads to. All other booking pages of your workspace are available; pages that are not live yet carry the note “(not live yet)”. If the selected page is not live or has been deleted, the button behaves as if nothing were selected.
Without a selection (Automatic), the block appears as soon as your workspace has exactly one active booking page with the Inquiry design, and the button leads to that inquiry form. If you have no or several inquiry pages and nothing is selected, the block is hidden — Univents will not guess which of your forms you meant. On embedded pages the guest stays inside the embedded area of your website instead of being thrown onto the full view.
Per webshop page you control the block in the Bookings section under Box “Custom?”: the switch Show the “Custom?” box hides it on that page, for example in a pure rental shop. Below it you can enter your own texts for the title, description and button; empty fields show the default text. You maintain translations of your own texts in the Languages section like all other page texts.
Custom sections instead of categories
Normally the page is organised by the categories from your inventory: in the Stepper each category becomes its own step, in the Inquiry a collapsible block, in the Webshop an entry in the filter bar. Under Section 03 Bookings → Page structure you can choose Custom sections instead and arrange the page for this offer, for example “Event package”, “Merchandise” and “Event furniture”. Your inventory stays as it is.
- Add a section: With Add section you enter a title, a short description and the products. You can assign individual products or whole categories. With a category, new products and the products of its subcategories are added automatically.
- Order: Drag the sections by their handle into the order you want. Within a section, individually chosen products come first in their order, followed by the products from categories.
- One product, one section: On a page, a product can only be in one section. The dialog names the section it is already in. On another page the same product may be in a different section.
- Products without a section: If a product is offered but not in any section, it appears at the end in a collection section. The editor lists these products below the sections.
- How guests see the sections: In the Stepper and with Location first, each section is a step with title and description. In the Inquiry, each section is a collapsible block. In the Webshop, the filter bar shows the sections, and under All each section appears as a block with title and description. Questions of a product appear in the step of its section.
- Second language: If another language is enabled on the page, you enter title and description in that language in the section dialog too. Without a translation, guests see the original text; section titles and descriptions are not translated automatically.
- Delete: A section can be deleted after a confirmation. Its products stay bookable and move to the collection section.
- Back to categories: If you switch back to By categories, the page looks as before. Your sections stay saved.
Custom sections are available from the Core plan. The AI chat can also add, rename, reorder and delete sections (“Add a Merchandise section with mugs and shirts on the company party page”). On quotes, invoices and in the kitchen, the category stays what counts.
Show and hide products by selection
Under Section 03 Bookings → Show and hide products by selection you create rules that show individual products, whole categories, or one of your own sections only once the guest has picked or answered something specific. Typical cases: “spirits only appear when the drinks flat rate is in the cart” or “the children’s menu only appears when the answer to the question about children is Yes”.
- Create a rule: With Add rule you first choose what is controlled — a product, a category, or a section of the page. Then you set the condition: product chosen (a product from your inventory) or question answered with (a question on the page and the answer option). A rule needs at least one condition.
- Several conditions are OR: The target appears as soon as one of the conditions matches. For an “and”, do not put the condition into the same rule — use a second rule where it fits the business case.
- The other way round: With the behaviour disappears once the condition is met you invert the rule, for example “no lunch package when the full-day package is chosen”.
- Preview: Below the list you see which products a guest does not see at the start — calculated as if the guest had picked and answered nothing. That way you notice a rule that hides too much right away.
- When the condition falls away: If the guest removes the triggering product or changes the answer, the dependent product disappears and is removed from the cart with a short notice. In the stepper, a step with no products left disappears.
- Checked on submit too: The server does not accept an order that contains a product whose condition is not met, and it names the product. That protects you from orders you would not sell that way.
- No effect: If a trigger is deleted or removed from the page, the editor marks the rule as has no effect. It then hides nothing, so no product stays invisible forever. Check the rule and delete or fix it.
- Mandatory products: A product that is mandatory on the page cannot become dependent. It is part of every booking, so it does not appear in the selection.
- Deleting: You delete a rule after a confirmation. The product is then visible to all guests again.
Visibility rules apply in every design with product selection — stepper, location first, inquiry, webshop, and the AI chat on the booking page. They act before submitting; existing bookings stay untouched. In the webshop grid and in the chat the guest sees the page’s starting state, because questions are only asked at checkout there — the check on submit still applies. Visibility rules are available from the Growth plan, and the AI chat in the back office can read, create, and delete them (“Show the spirits on the wedding page only with the drinks flat rate”).
Categories in the webshop
The categories on the left of the webshop follow your category tree. When a guest picks a main category, they see the products of the main category and of all its subcategories. A main category without products of its own is therefore not empty as long as its subcategories contain something. A subcategory shows only its own products.
With many categories, the category list scrolls on its own and the sorting below it always stays within reach. The category label on the product image only appears when products from different categories are shown together, for example under All or in search results — once a category is selected, it is left out, and likewise under the headings of the shortened view (see the next section).
Large catalogues in the webshop
Search: Items whose name contains the search term come first. Items that only mention it in their description follow below under Mentioned in the description. A sentence that appears in every description (such as “Decorations like candles or flowers are not included”) therefore no longer pushes ahead of the matching items. With several words, every word has to appear. The number next to the search field counts both groups. This applies to every webshop.
For webshops with a lot of items there are two switches under Section 03 Bookings → Display of large catalogues (only with the Webshop design). Both stay off until you turn them on — without them the shop looks as usual.
- Shorten large catalogues: If a category or a custom section has more than eight items, All shows the first eight with a Show all 232 button below (with the actual number). It works like clicking the category in the sidebar. Smaller categories are still shown in full. Nothing is shortened when sorting by price or name, or while searching. On phones the button opens the category or section; the top bar then shows ← All and the other categories or sections to switch to. ← All takes the guest back to where they came from.
- Show sub-filter in sections (only appears when the page is structured by custom sections): If the guest picks a section with items from several inventory categories, a second, smaller row with these categories appears above the items, for example “All in Candles & Light”, “Candle holders”, “LED candles”. The order follows your category tree. A section with only one category gets no second row. On phones these categories appear under the section heading and, once the section is open, in the top bar to swipe.
Categories in the Stepper and Inquiry designs
In the other designs, too, your product categories split the page into areas — such as “Event package”, “Drinks” and “Event furniture”:
- Stepper: Every category that has items on the page becomes its own step. The steps follow the order of your categories in the inventory. Items without a category are collected in one step at the end. If none of the items has a category, there is a single product step.
- Inquiry: All products sit under one shared heading. Inside it, each category has its own collapsible block.
The step or block is titled with the category’s Booking Page Name. If that is empty, its name is used. You maintain both under Inventory → Categories in the category’s window. The booking page does not show a separate description per area.
Inquiry page step by step
In the Inquiry design, choose Everything on one page or Step by step under Display in Section 01 Details. Step by step shows the guest one question or course at a time: first the date, then the number of guests, the location, one step per category, then contact details and summary. Guests move on with a click. The overview on the right shows progress, selection and price, and it scrolls along on your own website too. Dishes appear as narrow rows, description and allergens open under Details. Submitting, prices and required fields stay the same.
Embedded on your website, the page shows only a “Start inquiry” button on phones. It opens the inquiry full screen, and “Back to …” at the top and after submitting returns to your website.
Make the page leaner with these settings:
- Section 05 Questions: hide “Multiple days” and “Date is flexible”, ask only for the date without a time, set company fields to Hidden, enter your own title instead of “Event” and your own label instead of “Billing address” (for example “Your wedding” and “Private address”).
- Section 03 Bookings: “Location cards without photo” shows only name and capacity in the selection.
- Section 05 Questions: Under Help note enter who the guest can ask while filling in, for example “Questions? +49 8027 585 · info@company.com”. The note appears below your logo and in the overview; phone number and email are clickable.
What the guest also sees:
- Your logo appears large and centered at the top, with a “Back to …” button. The Univents bar disappears on every booking page with a logo; a small “Powered by Univents” stays at the bottom. If the guest did not come from your website, the button leads to the address of your imprint link.
- If you group the page by your own sections (Section 03), each course shows subheadings per category, for example beer, juices, wine and packages separately under “Drinks”.
- The overview on the right shows full names and quantities, each item can be removed with ×, and the number of guests can be changed right there. Required steps carry an asterisk. Every step is clickable, so courses can be skipped; date, guests, address and contact details are still checked.
- Questions about a selected product, for example “Main course: choose up to 3”, appear in that product’s course right below the selection, not at the end; “Next” checks them there. On a phone they appear in the continuous list right below the product’s section. In a multiple choice, an answer with a linked product shows that product’s image as a small preview; clicking it opens the details. The chosen answers appear in the overview below their product, with a linked product also with quantity and surcharge. For prices “per person”, the overview and the summary show the portions for all guests (for example “25 ×”).
- If the guest types the address without picking a suggestion, “Next” looks it up.
- Date, guests, location and selection stay saved in the guest's browser for 14 days. When they come back, their selection is restored; “Start over” starts empty. Contact details and address are not saved.
The booking page on phones
Below 640 pixels wide, your guests see all products in Webshop, Stepper, Location first and Inquiry in one continuous list, grouped by category or custom section. A bar with the categories sits at the top: tap to jump to a category, and the marker moves along as they scroll. Each row shows the name, price and two lines of description, with a small image and a round plus button on the right. Tapping a row opens the details, which also list the allergens. In the stepper, location first and the step-by-step layout, the selection on phones is a single step instead of one per category. Item count and total stay visible at the bottom, and a button leads to the next step. On tablets and computers everything stays as described above. If the page is embedded on your website, below 640 pixels wide only a button appears there instead of the design: it opens the page in the full window, and “Back to …” at the top and after submitting returns to your website.
Prices in the webshop
If you keep an item with a gross price (for example €0.85 incl. 19% VAT), the product card, cart and total show exactly that amount. Rounding only happens at the end, not on the net price.
Items with variants (sizes) in the webshop
If you sell the same item in several sizes — Cola in 0.33 l, 0.5 l and as a 1.0 l carafe — the guest sees one card per item: image, name and description come from the main item and sit at the top. Below that, Choose a size shows one chip per size; the chosen size determines price, availability, minimum and maximum quantity and the quantity rule, and the size is what lands in the cart.
If a size is sold out or unavailable on the chosen date, its chip stays visible but is locked and names the reason on hover. If only one size is visible, the card still offers the choice — the grid does not jump when a size sells out. Nobody can put the main item itself into the cart; its card only describes the group.
How to create variants is described in Items with variants.
What guests see under “When & for how many?”
If guest groups are selected on the page, each group gets its own number field instead of the single field for the number of people; below them the page shows the total number of guests, which adds up the counting groups only. Groups such as musicians or suppliers carry the note “Recorded separately” and do not raise the total. The required entry counts as done as soon as at least one counting group has a number.
Without guest groups the number of guests field is empty and only shows a grey example (“e.g. 20”). If a required entry is still missing, the Request & book now button says what is missing, for example “Please still enter the number of guests.” When guests go from the checkout back to the webshop via Back to shop, their entries including the selected delivery address and room are kept, and the button is active again right away.
Section 04 Price, Order & Quote
Here you decide how prices are displayed and how inquiries are processed further.
Under Payment Processing you choose exactly one mode: Do not create a document automatically, Create quote draft automatically, Create and send quote automatically, Create and send invoice automatically, or Allow direct payments. For the two quote modes you choose a Quote template, and for the invoice modes an Invoice template. Direct payments and automatic invoice sending require a connected payment provider.
Whichever mode is selected here is the one that applies. With Do not create a document automatically, an enquiry through this page produces neither a quote nor an invoice — you create the document yourself when you need it. New pages, and pages where you never touched this setting, still create a quote draft.
In the Display Settings, several toggles are available: Apply pricing conditions, Show prices, Show prices as gross (incl. VAT, ideal for private customers), and Show pricing conditions in the description. If Show prices is off, products and the options of product questions show no amounts, and no version of the page (Stepper, inquiry form, webshop, AI chat) states an estimated total at the end or on the thank-you page — only with a direct payment is the amount to be paid shown there. With Minimum order value you set the Amount (EUR) that an inquiry must reach at minimum.
Price group for this page (Growth and above): once you have created groups under Settings > Price groups, you can optionally pick one here, for example “Trade fair” for a trade fair webshop. Product cards, cart, day view, stepper, configurator and the AI chat of the page then show that group’s price everywhere, and the request arrives with exactly that price. The event carries the group, so later recalculations do not fall back to the standard price. Your pricing rules and a price from an effective date keep calculating on top of the group price. Without a selection the standard prices apply. A group you delete later behaves like no group. After a downgrade, a group that is already selected stays in effect; it just can’t be set anew. Tickets and wage items always keep their own price. If no price groups exist yet, the field links straight to Create price groups.
Two more toggles automate what happens after a payment: Auto-accept on payment accepts the inquiry automatically as soon as the Stripe payment is received. Apply event template on payment automatically creates the artefacts from an event template once payment comes in — for this you additionally choose an Event template.
Invoice after an online payment: When your customer pays directly on the booking page, the invoice is created after the payment and therefore does not ask for the money again: instead of a request to transfer the amount, the PDF shows a note such as “The invoice amount of €250.00 was already paid on 2026-10-19.”, the header says “Paid on” instead of “Due date”, and the e-invoice shows 0.00 as the amount due. If the invoice is higher than the amount paid, the normal payment request stays. Invoices your customer pays later via the payment link keep it as well. The email that comes with the invoice then also shows “Paid on” and “already paid” instead of “Due on”, without bank details and without a transfer request. If the request had no event yet when your customer paid, Univents creates the invoice as soon as the event exists, for example after you accept the request.
Submitting (stepper, Location first, and inquiry). Under Submitting you adjust the end of your page:
- Hide the payment step when no payment is needed (stepper and Location first only): The Booking step is skipped and your guests send their inquiry straight from the Summary — where they also give their consent. This only works as long as Allow direct payments is not selected; with direct payment the payment step stays.
- Note when submitting: Your own text right above the submit button, for example “This request is non-binding – we will get back to you within 2–3 working days.” If the payment step stays visible, the note replaces the default text “You are submitting a request. We will get back to you within 24 hours.” there. On an inquiry page (design Inquiry) the note appears in both layouts right above the submit button; there is no payment step it could replace.
- Submit button text (stepper and Location first only): Replaces the label “Submit request — we'll get back to you in 24–48h”. With direct payment the default text stays.
If you leave the fields empty, the default texts apply in the stepper. On an inquiry page the note then does not appear at all — no replacement text is shown there. You translate all texts in the Languages section.
Sections 05 to 07 Questions, Analytics, and Customer Portal
The final three sections round out the page.
- Questions: Under Standard fields you make entries such as Phone, Mobile phone, Address, Company name, or Billing address mandatory. You can also turn on the Salutation (Ms, Mr, Mx) there, as an optional or a required field; it is saved on the contact and used on quotes and invoices. Name and email are always required. Under Custom Questions you add your own fields via Choose existing question or New question. Below that you can add a note above the contact fields and your own placeholders for name and email — handy if the page is, say, an internal request form. Left empty, the default texts stay; you translate them in the Languages section. They don't apply to the AI chat.
- Analytics: Enter your GTM container ID and, if needed, add Code for
<head>or Code for<body>. Conversion tracking via PostHog is active automatically. - Customer Portal: The portal link is included in every confirmation email anyway. With Enable advanced customer portal features, you unlock the editing deadline, follow-up questions, and add-on products. Using Customer can edit booking themselves and the Editing deadline (days before event), you control later changes, which you then confirm.
Arranging questions, adding headings and asking for the date only
In the Questions section you decide where and how your own questions appear on the booking page.
- Ask at the start: You find this switch below each of your own questions. When it is on, the question appears in the first step next to the date and the number of guests instead of at the end with the contact details. This works well for budget, occasion or time of day. It applies to the Stepper, Location first and Inquiry designs. In the webshop, your own questions stay at checkout.
- Heading above: If you enter a heading for a question (for example “Budget & occasion”), it appears as a heading above that question and starts a section. All following questions belong to it until the next heading. You still set the order of the questions with the arrows. The heading only structures the page: it does not appear in any inquiry or email.
- Start time only (date and start time): In the standard fields, under Time, you choose how the page asks for the time: Start and end (default), Start time only or Ask for the date only. With Start time only, your guests pick the day and a start time but no end time; the start time is then required. It is meant for offers where the guest chooses the length with the service, for example a ride of one or two hours. The inquiry reaches you with a start and without an end; you enter the end yourself when you accept the inquiry, if you need it. For booked rooms and the maximum number of parallel events it counts like every event without an end: six hours from the start. Products with a time window can be booked if the start time lies within the window. The Multi-day event toggle is then not offered. The exception is the webshop with Split cart per day: there Multi-day event stays, because each day carries its own items; for booked rooms such a booking then only counts until the start of the last day. If the page checks rooms, ask for start and end there.
- Ask for the date only, no time: With this option, your guests only pick the day; the start and end time fields disappear. To ask for “lunch” or “evening”, add your own choice question and turn on Ask at the start for it. The inquiry reaches you without a time. For booked rooms, the rule for inquiries without a time applies: a room is free as long as a window of at least 4 hours is still free that day. If a room offers fixed time slots, the chosen slot still applies. You enter the time yourself when you accept the inquiry.
Good to know: Services billed per hour that have no time slot of their own are calculated as one hour without an end time (price × quantity), both with Ask for the date only and with Start time only. On pages with such services, ask for start and end.
Access: opening a page only to your own email domains
In addition to the eight sections there is the Access section. There you decide that a booking page is visible and usable only for guests whose email address belongs to one of your own domains — for example an internal ordering page for your field sales team. If the Access only for these email domains field stays empty, the page is open as before. Guests unlock it with a code sent by email; afterwards the device stays in for 30 days. The feature is part of the Scale plan. How it works in detail is described in Restrict access to a booking page.
Languages section
When you open a page that has already been saved, Languages appears as the final section. There you additionally enable the page in English and maintain the English texts — guests then see a DE / EN switch at the top. How to go about it, and why product translations are approved one by one, is described in Offer your booking page in English.
Writing the description and info block with AI
In section 01 Details, the Description and the Info block (web shop) each have a Write with AI button. The suggestion is worded neutrally, without addressing the reader directly, and is saved with the page’s autosave. More: Writing texts with AI.
Tips
- Changes to an existing page are saved automatically in the editor. At the bottom left you'll see the status (Changes are saved automatically, unsaved changes or saved). Use Close to leave the editor; any pending changes are saved on the way. Only when you first create a new page do you click Create.
- Page not live yet: If you, as a member of your workspace, open the link of a page that is still a draft, you see a notice with an Open in editor button instead of “Page not found”. Guests keep seeing “Page not found” until you publish the page.
- Product order: It cannot be dragged and dropped in the editor. It follows your category order (Inventory → Categories) and, within a category, the product's internal name. To push travel or beer-table sets to the bottom, give those categories a higher Order number.
- Location order: You do not set it here but under Locations via the Order button — by dragging, once for all booking pages. If you move nothing, it stays alphabetical. See Creating and getting the most out of event locations.
- Use the toggle at the bottom of the editor to switch the page between live and draft without leaving it.
- Create separate booking pages for private and business customers — for example one with gross and one with net prices.
- With Open live preview you can immediately check every change exactly the way your customers see it.
- To embed the page on your website, use Copy embed snippet and paste the code into your website builder.